
How to make your nice looking IOT Dashboard Cellular project in a minute
Are you looking for DIY IOT solution for monitoring an object located remotely? Want to have a solution your project to be easily setup?
OVERVIEW
So, let us share our experience of setting up in a minute local condition DIY IOT monitoring demo project. IOT hardware, embedded firmware and Cloud Dashboard will be setup and configured. Local temperature, humidity and pressure, as well as device vital data, like a battery level and cellular RSSI, and, location info were obtained and published to ThingsBoard cloud.

ESP32 WiFi IOT controller board, Quectel BG96 cellular modem based Feather compatible shield with LTE and GNSS antennas attached, and, BME280 sensor module were used. ThingsBoard Local Condition IOT Dashboard was created.
HW SETUP
IOT board
Adafruit HAZZAH32 ESP32 controller board with Stacking Headers was used.

This was a nice and powerful IOT board with WiFi and BT/BLE wireless embedded. We used this board for Demo because of its popularity and availability.
Connectivity
As we planned, we would like to build remote device monitoring DIY IOT solution, so, we had decided to use cellular connectivity and wanted to demonstrate our newest product - qTop Cell BG96 Feather compatible shield (by IOT-BOTS.COM).


This device was the part of qTop family, which included Quectel and uBlox Cellular, LoRa, GNSS and sensor shield to be used together with Feather and Arduino MKR Compatible IOT boards. This board is would be available in the beginning of Q2 2021.
qTop BG96 shield was plugged to controller board Feather Compatible Interface connectors. We set modem to function in GSM (2G) mode because of several reasons, so any 2G SIM card would perfectly worked - we used SpeedTalk Mobile SIM Card.
LTE and GNSS internal antennas with u.FL connectors were applied to BG96 modem board.
Sensor
To make this Demo alive, we brought local condition monitoring feature and qJam BME280 sensor module was used for it.

qJam Temperature / Humidity / Pressure BME280 module was part of the newest qJam IOT device line, developed and manufactures by IOT-BOTS.COM. Module was plugged to appropriate connector of qTop shield. I2C interface was used to communicate with module.
BTW, any other BME280 sensor module could be used as option - you just needed to connect 3,3V power and I2C bus and check the module I2C address and change it in source code if required.

THINGSBOARD CLOUD
ThingsBoard IOT open-source platform was chosen as IOT Cloud Dashboard. We created dashboard that all sensors and device data were shown there:
- Temperature, humidity, pressure sensors data gauges;
- Battery level and cellular RSSI;
- Location, speed and GNSS info;
- Temperature, humidity, pressure sensors data timeseries charts;
- Map with device location.
You don't need to build this dashboard from scratch - ThingsBoard.io platform allows to reuse made early dashboards through Import-Export JSON format feature. So, to get this Demo dashboard you just need to make these simple steps:
create ThingsBoard account
If you don't have ThingsBoard account, you need to proceed to ThingsBoard website login page. As soon as you complete this step, you will receive confirmation email and will be able to login there.

Add device
Next step is adding device and getting device token. We used "qTop-Modem" as device name.


As soon device added, please save token received - it will be used later.
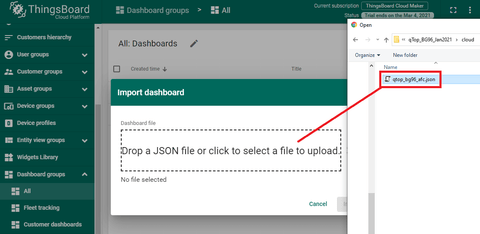
Import Demo dashboard JSON file.
Now we need to import Demo dashboard . Please go step by step as shown at pics below:


Finally, you will see empty dashboard and now you need to set aliases.
Edit aliases
Now, we need to "connect" Demo dashboard imported with "qTop-Modem" device added before:


After saving all changes, you will be able to see Demo Dashboard fully setup and ready to go.

EMBEDDED FW
Demo firmware was created using Arduino IDE. Demo sketch could be found here. It was created and built for Adafruit HAZZAH32 board as target HW.
These components and libs (we used the latest versions) to be installed for Arduino IDE to get sketch built and flashed to target HW:
- TinyGSM Lib;
- StreamDebugger Lib (if you want to turn modem AT command debug On);
All items could be installed through Arduino IDE or manually. You can find a lot of info on the Internet how to make installations mentioned above, so please let us skip this step.
As soon as all preparation completed, just open the sketch in IDE. To make system properly working, you need to make these changes in sketch opened:
- enter / edit APN info (check your SIM card provider);
- enter / edit ThingsBoard token (use token, copied from ThingsBoard "Token Step" completed before).
Picture below shows these places in the sketch:

FW developed could be run in two modes : "Always On" and "One Shot". In "Always On" mode system continuously published data with interval defined. For "One Shot" mode, system made single publishing and moved to Deep Sleep. By default, Demo run in "Always On" mode with 5 seconds publish delay interval (not actual publishing data interval).
To set mode wanted, "demo_mode" variable should be INITed with appropriate mode define.

FW functionality:
- After power up, GPIO config was done;
- Check that qJam sensor was connected : BME280 sensor found and data received;
- and, final setup() step was modem on.
In the main loop ("Always On" mode):
- getting BME280 sensor data;
- collecting modem / network status;
- requesting GNSS info;
- opening TCP/IP session (if not opened yet);
- publishing info received to a cloud;
- waiting for 5 sec.
In the main loop ("One Shot" mode):
- getting BME280 sensor data;
- collecting modem / network status;
- requesting GNSS info;
- opening TCP/IP session;
- publishing info received to a cloud;
- closing session opened;
- turn modem off;
- move to Deep Sleep.
HTTP and RESTful API option was used to publish data to ThingsBoard cloud.
We provided enough comments in source code, so, we hoped, it could be easily read and understood. Moreover, we put "printf" logging for all major execution steps - please see run logs below.
/////////////////////////////////////////////////////////////////////////////////////////////////////////////////////////////
***************************************************************************************************
**** IOT-BOTS.COM ****
**** qTop Quectel BG96 Shield ThingsBoard Demo ****
***************************************************************************************************
---- Setup Started ----
BME280 Sensor Found!
Modem Initializing...
[6178] ### TinyGSM Version: 0.10.9
[6178] ### TinyGSM Compiled Module: TinyGsmClientBG96
[9484] ### Modem: Quectel BG96
[9484] ### Modem: Quectel BG96
Modem: Quectel BG96 Revision: BG96MAR02A07M1G
IMEI: 86703504799XXXX
IMSI: 31026094158XXXX
CCID: 8901260941115897457F
---- Setup Done ----
---- Loop Cycle ----
Waiting for network... : Network connected
Connecting to "wholesale"... : GPRS connected
Get Network Time :
Year : 2021
Month : 2
Day : 14
Hour : 22
Minute : 51
Second : 33
Time Zone : -5.00
[16987] ### Unhandled: OK
Connecting to "thingsboard.cloud"... : Cloud connected
Battery:
Voltage, mV: 3849
Voltage, %: 56
BME280 Sensor:
Temperature, F: 78.30
Pressure, hPa: 990.76
Humidity, %: 15.17
Modem Power:
Voltage, mV: 4015
Signal Quality:
RSSI: 18
GNSS:
...No Data Available!
HTTP Request:
POST /api/v1/psExmXxbIXajWD3Voxnu/telemetry HTTP/1.1
Host: thingsboard.cloud
Accept: */*
Content-Type: application/json
Content-Length: 104
{"Bat.voltage":56,"Ext.voltage":0,"RSSI":18,"Temperature":78.296,"Humidity":15.1748,"Pressure":990.7645}
HTTP Reply:
[18092] ### URC RECV: 0
[18111] ### DATA AVAILABLE: 73 on 0
[18127] ### DATA AVAILABLE: 10 on 0
HTTP/1.1 200
content-length: 0
date: Mon, 15 Feb 2021 03:51:36 GMT
---- Loop Cycle ----
/////////////////////////////////////////////////////////////////////////////////////////////////////////////////////////////
In case, if no BME280 found, or, GNSS data was not available, that data were not published.
"All data received" log is below:
/////////////////////////////////////////////////////////////////////////////////////////////////////////////////////////////
---- Loop Cycle ----
Get Network Time :
Year : 2021
Month : 2
Day : 13
Hour : 21
Minute : 2
Second : 48
Time Zone : -5.00
Battery:
Voltage, mV: 3852
Voltage, %: 56
BME280 Sensor:
Temperature, F: 91.47
Pressure, hPa: 990.07
Humidity, %: 11.82
Modem Power:
Voltage, mV: 4013
Signal Quality:
RSSI: 17
GNSS:
Quality : 2
Date : 140221
Time : 020249
Latitude : 42.48779
Longitude : -83.43078
Altitude, m : 271
Speed, km/h : 74
Heading : 234
HDOP : 0.7
Sats In Use : 09
HTTP Request:
POST /api/v1/psExmXxbIXajWD3Voxnu/telemetry HTTP/1.1
Host: thingsboard.cloud
Accept: */*
Content-Type: application/json
Content-Length: 254
{"Bat.voltage":56,"Ext.voltage":0,"RSSI":17,"Temperature":91.472,"Humidity":11.82129,"Pressure":990.0728,"latitude":"42.48779","longitude":"-83.43078","altitude":"271","speed":"74","heading":"234","nsat":"09","hdop":"0.7","date":"140221","time":"020249"}
HTTP Reply:
[28206] ### URC RECV: 0
[28226] ### DATA AVAILABLE: 73 on 0
[28242] ### DATA AVAILABLE: 10 on 0
HTTP/1.1 200
content-length: 0
date: Sun, 14 Feb 2021 02:02:50 GMT
---- Loop Cycle ----
/////////////////////////////////////////////////////////////////////////////////////////////////////////////////////////////
Using logging prompts incorporated, you can see what it is happening with a system: check that all HW parts found properly working, see sensor and GNSS data, get connection results and data publishing status.
To check data receiving by cloud, you can verify it on "Latest Telemetry" tab for "qTop-Modem" device added.

As soon as all preparations completed and device turned on you would be able to see Demo dashboard with all data displayed.

Now you can play with your IOT dashboard, widgets and embedded source code to make your own version of this DIY IOT solution.
Enjoy!
CONCLUSION
It was shown how to easily setup nice looking DIY IOT Cloud Dashboard for remote local condition monitoring. To see sensor data, as well as vital data, like Battery, RSSI and location of cellular connected device.
ThingsBoard DIY IOT Dashboard was created.
ESP32 WiFi IOT controller board, Quectel BG96 cellular module based qTop Feather compatible shield with LTE and GNSS antennas attached, and, qJam BME280 sensor module were used.
TRADEMARK NOTICE
All referenced brands, product names, service names, and trademarks are the property of their respective owners.